Saturday, December 31, 2011

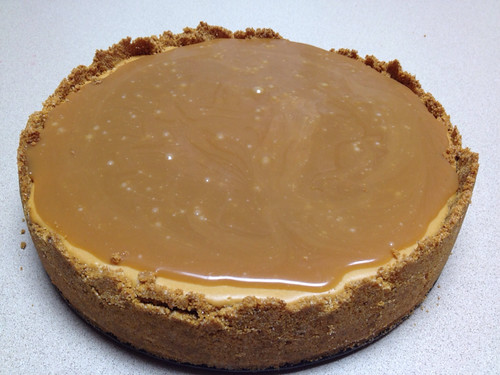
Salted Caramel Cheesecake

I tweaked this recipe quite a bit based on the comments/reviews from the original blogger.  

My changes:
  1. I used the crust recipe from the back of the graham cracker crumb box.  The original recipe would have been way too hard (too much butter) and salty.
  2. I didn't put any salt in the filling.  I figured the salted caramel would be enough salt.
  3. I decreased the sugar from 1 1/4 cups to about 3/4 cups.  It seemed like way too much when you figure the dulce de leche is already sweet,
  4. I used my trusty salted caramel sauce recipe.  Why mess with a good thing?

The cheesecake was wonderful!  Not too sweet but sweet enough with the sauce.  Everything was PERFECT.  Wouldn't change a thing!

So basically it's a caramel cheesecake.  Jim said its the best cheesecake he's ever had!  Better than the Cheesecake Factory.  That's some high praise coming from him.

Now what to do with the rest of it?!  Freeze it (:  Save some for my foodie BFF's at work (:


Friday, December 30, 2011

Corn Dogs and Fried Cheese on Sticks

I don't know if deep frying is my thing.  It's not the healthiest but it was a worthwhile experiment and rare treat.

I made corn dogs and fried cheese on a stick!  I followed a recipe from the Pioneer Woman.  She knows what she's doing!  I thought we had a Fry Daddy (from Jim's bachelor days) but it must have gone the way of the Goodwill (or Disabled Vets) some time ago.  I don't have experience with deep oil so I looked up directions online and then saw all the fire warnings.  Eeeeek!  The fire extinguisher and baking soda (recommended) came out just in case!

Here are some of the corn dogs and pieces of pepper jack cheese and Colby jack.  The PW suggested using chopsticks but wooden skewers did the trick too.


I was able to use my new cast iron pot!  (Thanks Laura!)


He likes it!  He likes it!  (Shocking!)


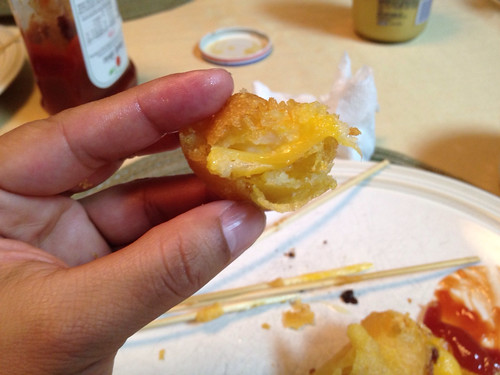
The inside of the cheese balls.  Some were balls, some were sticks.  


So our final verdict?  I think I'll stick to state fair and carnival corn dogs.  These were good but a lot of worry.


Tuesday, December 20, 2011

Gingerbread Cake Balls

So my gingerbread balls chilled for a day in the fridge.  I decided to tackle them the next day with some red candy coating, though I don't think it's very red.  I also neglected to see that I don't have Christmas sprinkles in the house.  I think I threw them all out last year because I questioned their age.  I made do with what I had.

So I have this nifty little chocolate melting pot now.  I used a Michael's 50% off coupon.

I had some fondue forks and used those to spear the balls temporarily to cover them with the melty chocolate.


I let most of it drip off and I tapped the side of the fork against the pot.  When it stopped dripping I carefully laid the balls on a wax paper lined baking sheet.


I added sprinkles before they dried.


And then after a quick five minutes in the freezer (when I was all done) they were set!  We each enjoyed two with a glass of milk.  Jim is my official taste tester.  He said they were good :)


My cake balls never formed perfect balls.  They were a little lumpy.  I guess I could have wet the crumbs a bit more to get them to really stick together.  I was happy with my first solo attempt though!


Sunday, December 18, 2011

Andes Peppermint Cupcakes

I don't get to participate in the office potluck on Tuesday so I decided to bring my cupcakes on Monday. The office staff can spread the (food) love on Monday AND Tuesday.

These are my favorite chocolate cake recipe (from the back of the Hershey's cocoa tin) with a bit of Mint Chocolate ganache in the middle and then finally the Peppermint Buttercream on top.  I meant to only tint the frosting with green but it ended up a bit brighter than I expected.  Ooops.  A little gel coloring goes a long ways...

Truly they are NOT as green as this picture.  Close though!


I'm never really a frosting girl so a little of this frosting would have been good for me.  It was very minty and very creamy.  The block of cream cheese really made a difference I think!  The ganache was barely noticeable.  I had issues with the squeeze bottle.  The recipe suggested using a squeeze bottle but I think that's a bad idea.  Too thick.  Pastry bag next time, for sure.


This green is really freaking me out!  I don't think I've ever really colored frosting.  Well, not since the blue cookie monsters.  I'm sure they'll get eaten, right?


Gingerbread Cake

I had a plan when making this cake.  I knew that it would end up in small balls.  But first we each had a piece to "taste test".  It's a spicy, classic gingerbread cake!


I put the baked cake through the food procesor to make it into crumbs.  And I added just a bit of this "natural" caramel creamer to make it wet enough to roll into balls.


Cake balls!


I am working in stages.  I put these caked balls into the fridge for another time.  Probably tomorrow night I'll melt the chocolate and cover these babies!  Without sticks, so more like truffles.

Click here for the stolen recipe for Classic Gingerbread Cake.

Wednesday, December 14, 2011

Betty Crocker

Who knew that I've been following a 1974 Betty Crocker recipe?  My friend Christa gave me this recipe a few years ago and we've kept it secret because if too many people have the recipe it becomes "common". Haha.  We are silly.

It's just not the holidays unless I make this candy.  I can't wait!

I use Hershey's bars instead of the chocolate chips.

Betty Crocker 1974, English Toffee Candy

This tip was confirmed by my friend Ann last week- do not cool candy in the freezer.  The layers will separate.  I've done this a few times and it's no fun to have the chocolate and the toffee break apart.  Imperfect candy can still be eaten but it's just not the same!

Sunday, December 4, 2011

Cake Pops


I took advantage of a Crowdcut deal (kinda like Groupon) and signed up for a cooking class. I ended up choosing this one, Elegant Cake Pops and Truffles-

Dazzle your family and friends this holiday with a collection of elegant gourmet cake truffles. You will create a variety of cake pops and cake truffles covered in shimmering gold, silver, red, green and other festive colors. Our truffles will consist of cornmeal pound cake with rosemary infused cream, snickerdoodle cake with vanilla bean cream and gingerbread with a creamy orange infusion. We’ll top our truffles with snowflakes, sparkles, glitters and other lovely edible creations

It was great! I worried because my other experience was so-so, actually not great at all. This class was pretty basic but at least it was in an area that I didn't really have much experience. I've made cake pops before but it was a frustrating, endless effort. Here are a couple of things that I learned:

Don't do it all at once. Have the cakes and "moisturizer" (more on this below) ready a day or more in advance. Don't try and make the cake and moisturizer the same day as you're decorating. It's just too much. This was my mistake before! The instructor had all the cakes and creams ready for the class. We were given a chance to assemble the cake balls and we put them in the freezer to firm up while we worked on other things. You could even do this part ahead of time too, and then decorate on another day.

You don't need to use cake mixes and canned frosting. Bakerella (famous blogger, really THE cake pop queen) uses them because it's user friendly. You can use almost ANY crumbled cake for these cake pops. And you don't need to use frosting! Cake pops are good but using cake/frosting combos make them overly sweet. This instructor showed us that you can use any cake and infuse your own cream for the "moisturizer".

The moisturizer is just the liquid that you use to bind the cake crumbs so that you can roll them into balls. She said you can use 5-7 Tablespoons of liquid (cream, liquor, juice, etc) per 9x13 cake recipe. We did this in the class and it worked great.

Cake balls should be rolled in your cupped hand. It rolls into better formed balls that way. Just a tip.

The cake should be cooked, cooled, and then processed in the food processor. Fine crumbs. Fluffy moist cakes are not necessary, actually discouraged. If you really want to use a fluffy cake you should let the crumbs sit out for awhile so they dry out.

We used chocolate melting pots for the cake pop dipping. I learned that the chocolate I used in the past was NOT thin enough. It should be the consistency of hot fudge. We didn't really dip the cake balls into the melted chocolates, but spooned the chocolate to cover the cake ball.

If the chocolate is not thin enough you can add a Tablespoon of Crisco. This kind of grosses me out but it's necessary.

I also did not let enough of the melting chocolate drip off the cake ball in the past. The method today was to get as much of the chocolate off the cake ball as possible. This is done by tapping the stick on the side of the chocolate pot, very lightly, swirling the cake ball repeatedly as you do this.

You can decorate the cake balls immediately with sprinkles, sparking sugars, etc. They can then be placed in the freezer for 5-10 minutes to firm up.

And last, I learned that you can all of this ahead of time. Decorated and all. They can be packaged and frozen!

We also went over how to make the cake balls as truffles (no sticks) and we made cake balls in the shapes of cupcakes. I was unofficially voted the Best Cupcake maker in the class. Everyone said mine was perfect looking :)

The cooking school was very interesting. I'm going to look into more classes but I think they are pricey at regular cost. We'll see! The cooking school is called Chefs Abode.

I think I'm done for tonight. I just want to sleep :)